I'm extremely lucky. In my 15+ years of messing with computers, I've never lost data due to HDD developing bad blocks and dying. Never! 🙂
Other people are not that fortunate. So, last weekend I was asked to look at an Acer laptop that just won't start. Windows startup screen shows up, stays for 5-10 minutes and computer reboots. Safe mode doesn't start, Alt-F10 Acer Recovery Console won't show up, nothing. At least I got Windows Memory Diagnostics to show up - and it didn't find anything wrong with RAM.
After I disabled Automatic Restart on System Failure (and waited 10+ minutes for Windows to crash), I got this nice error UNMOUNTABLE_BOOT_VOLUME (STOP: 0x000000ED):
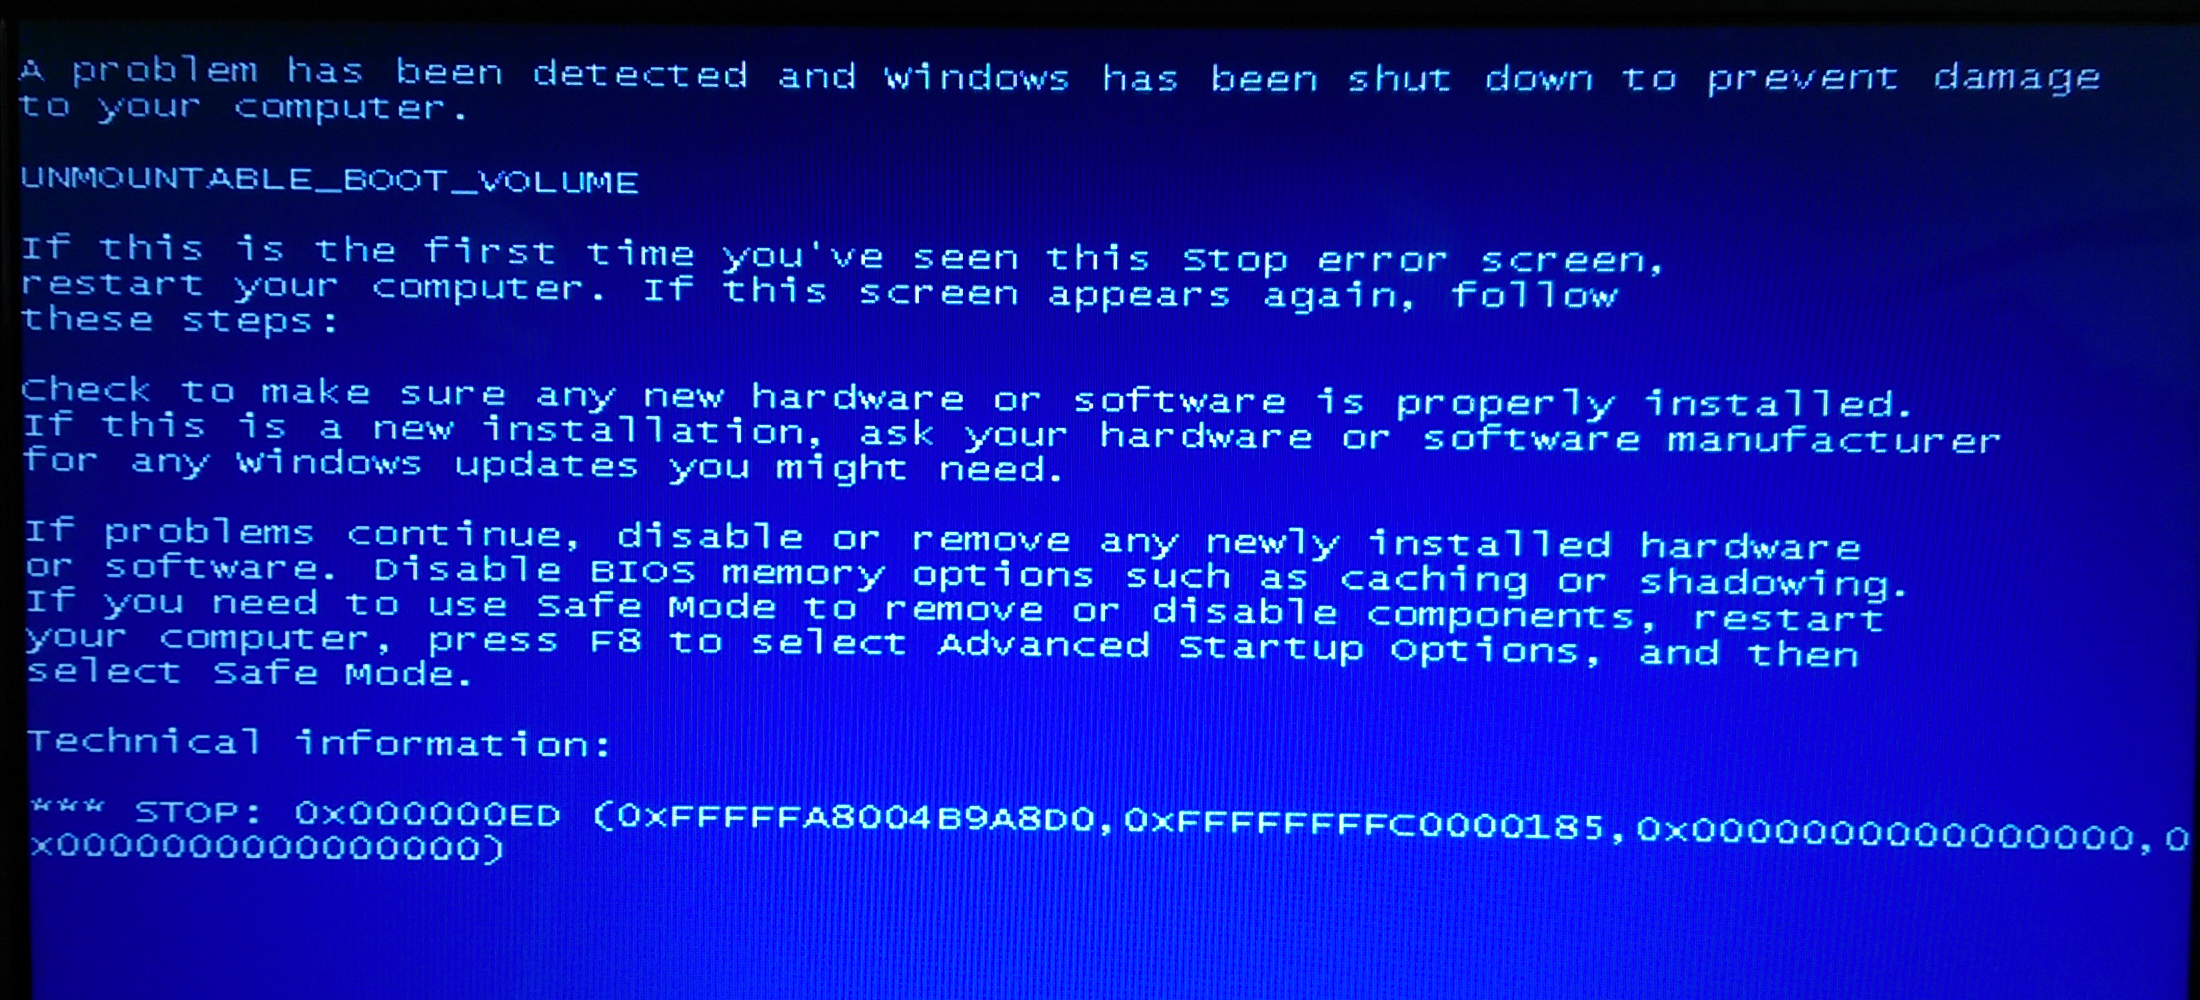
Considering how much time it takes to get to the error, it's probably a bad hard disk.
Disassembly time!
I removed 2 screws to get access to HDD. First thing I saw was this huge scratch all over HDD bracket and cover plastic.
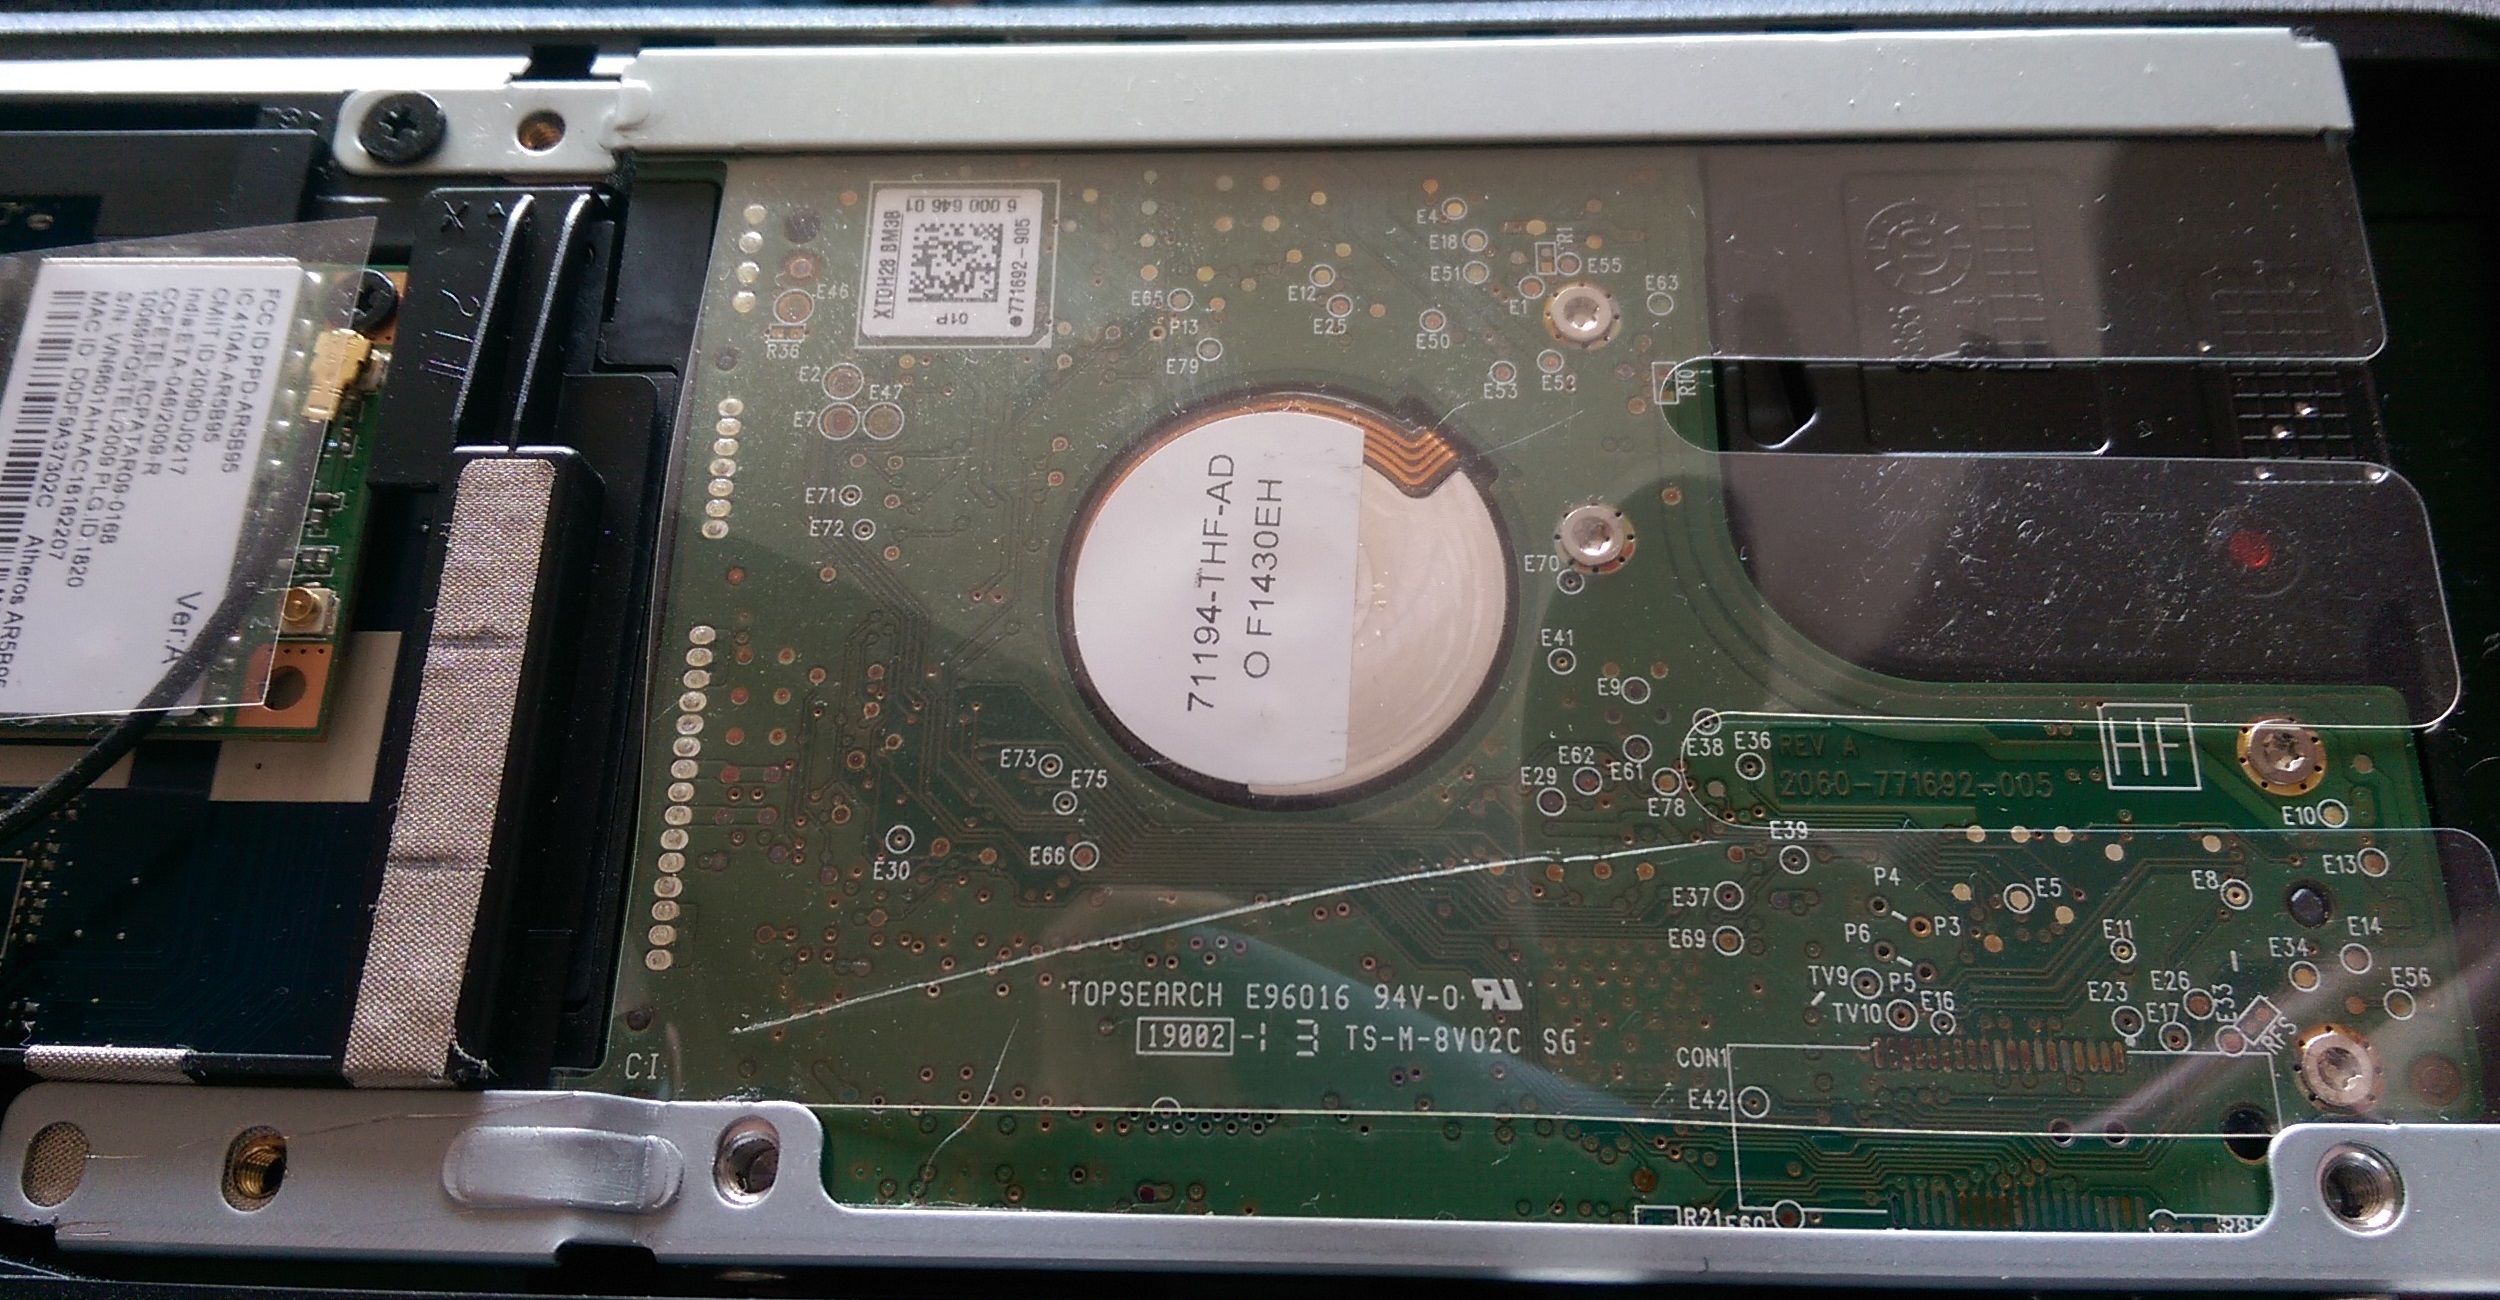
Apparently Mr.Awesome Neighborhood PC Repair Dude has tried to remove HDD with a screwdriver and failed. He had also broken few plastic clips on HDD cover - but who cares about those, right? At least, he did no visible damage to the electronic parts of HDD. 🙂
Let's try to attach disk to another PC and see if it's really bad.
Windows hates bad disks
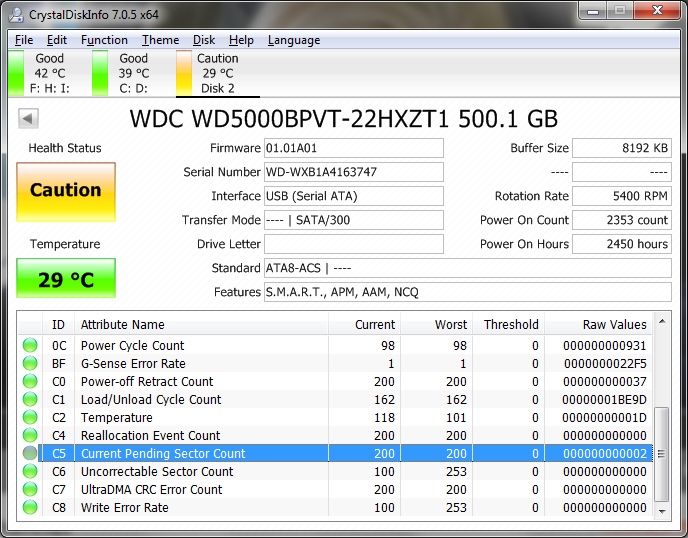
Let me tell you, attaching it to my Windows computer was a bad idea. When disk was plugged in, Windows took 5 minutes to start. Any program took 1-2 minutes to start. To be honest, I have no idea why Windows were acting so weirdly, but hey, kids, don't try this at home! 🙂
At least I got an output from Crystal Disk Info which confirmed my suspicions - bad HDD:
On the side note, Internet is full of really stupid advices. If you suspect that your disk might be physically damaged and dying, never ever use "chkdsk" or similar tools on it! They will likely fail and/or corrupt your data even more. Make a full disk copy and try to fix data there.
Lesson learned - don't use Windows if your HDD is dying. Linux is much safer and data-recovery friendly!
Clonezilla
After some Googling, I found Clonezilla. It's a free Linux-based software that helps with disk imaging/cloning. Reviews were nice, so I made a bootable USB with Clonezilla and tried it out.
It failed.
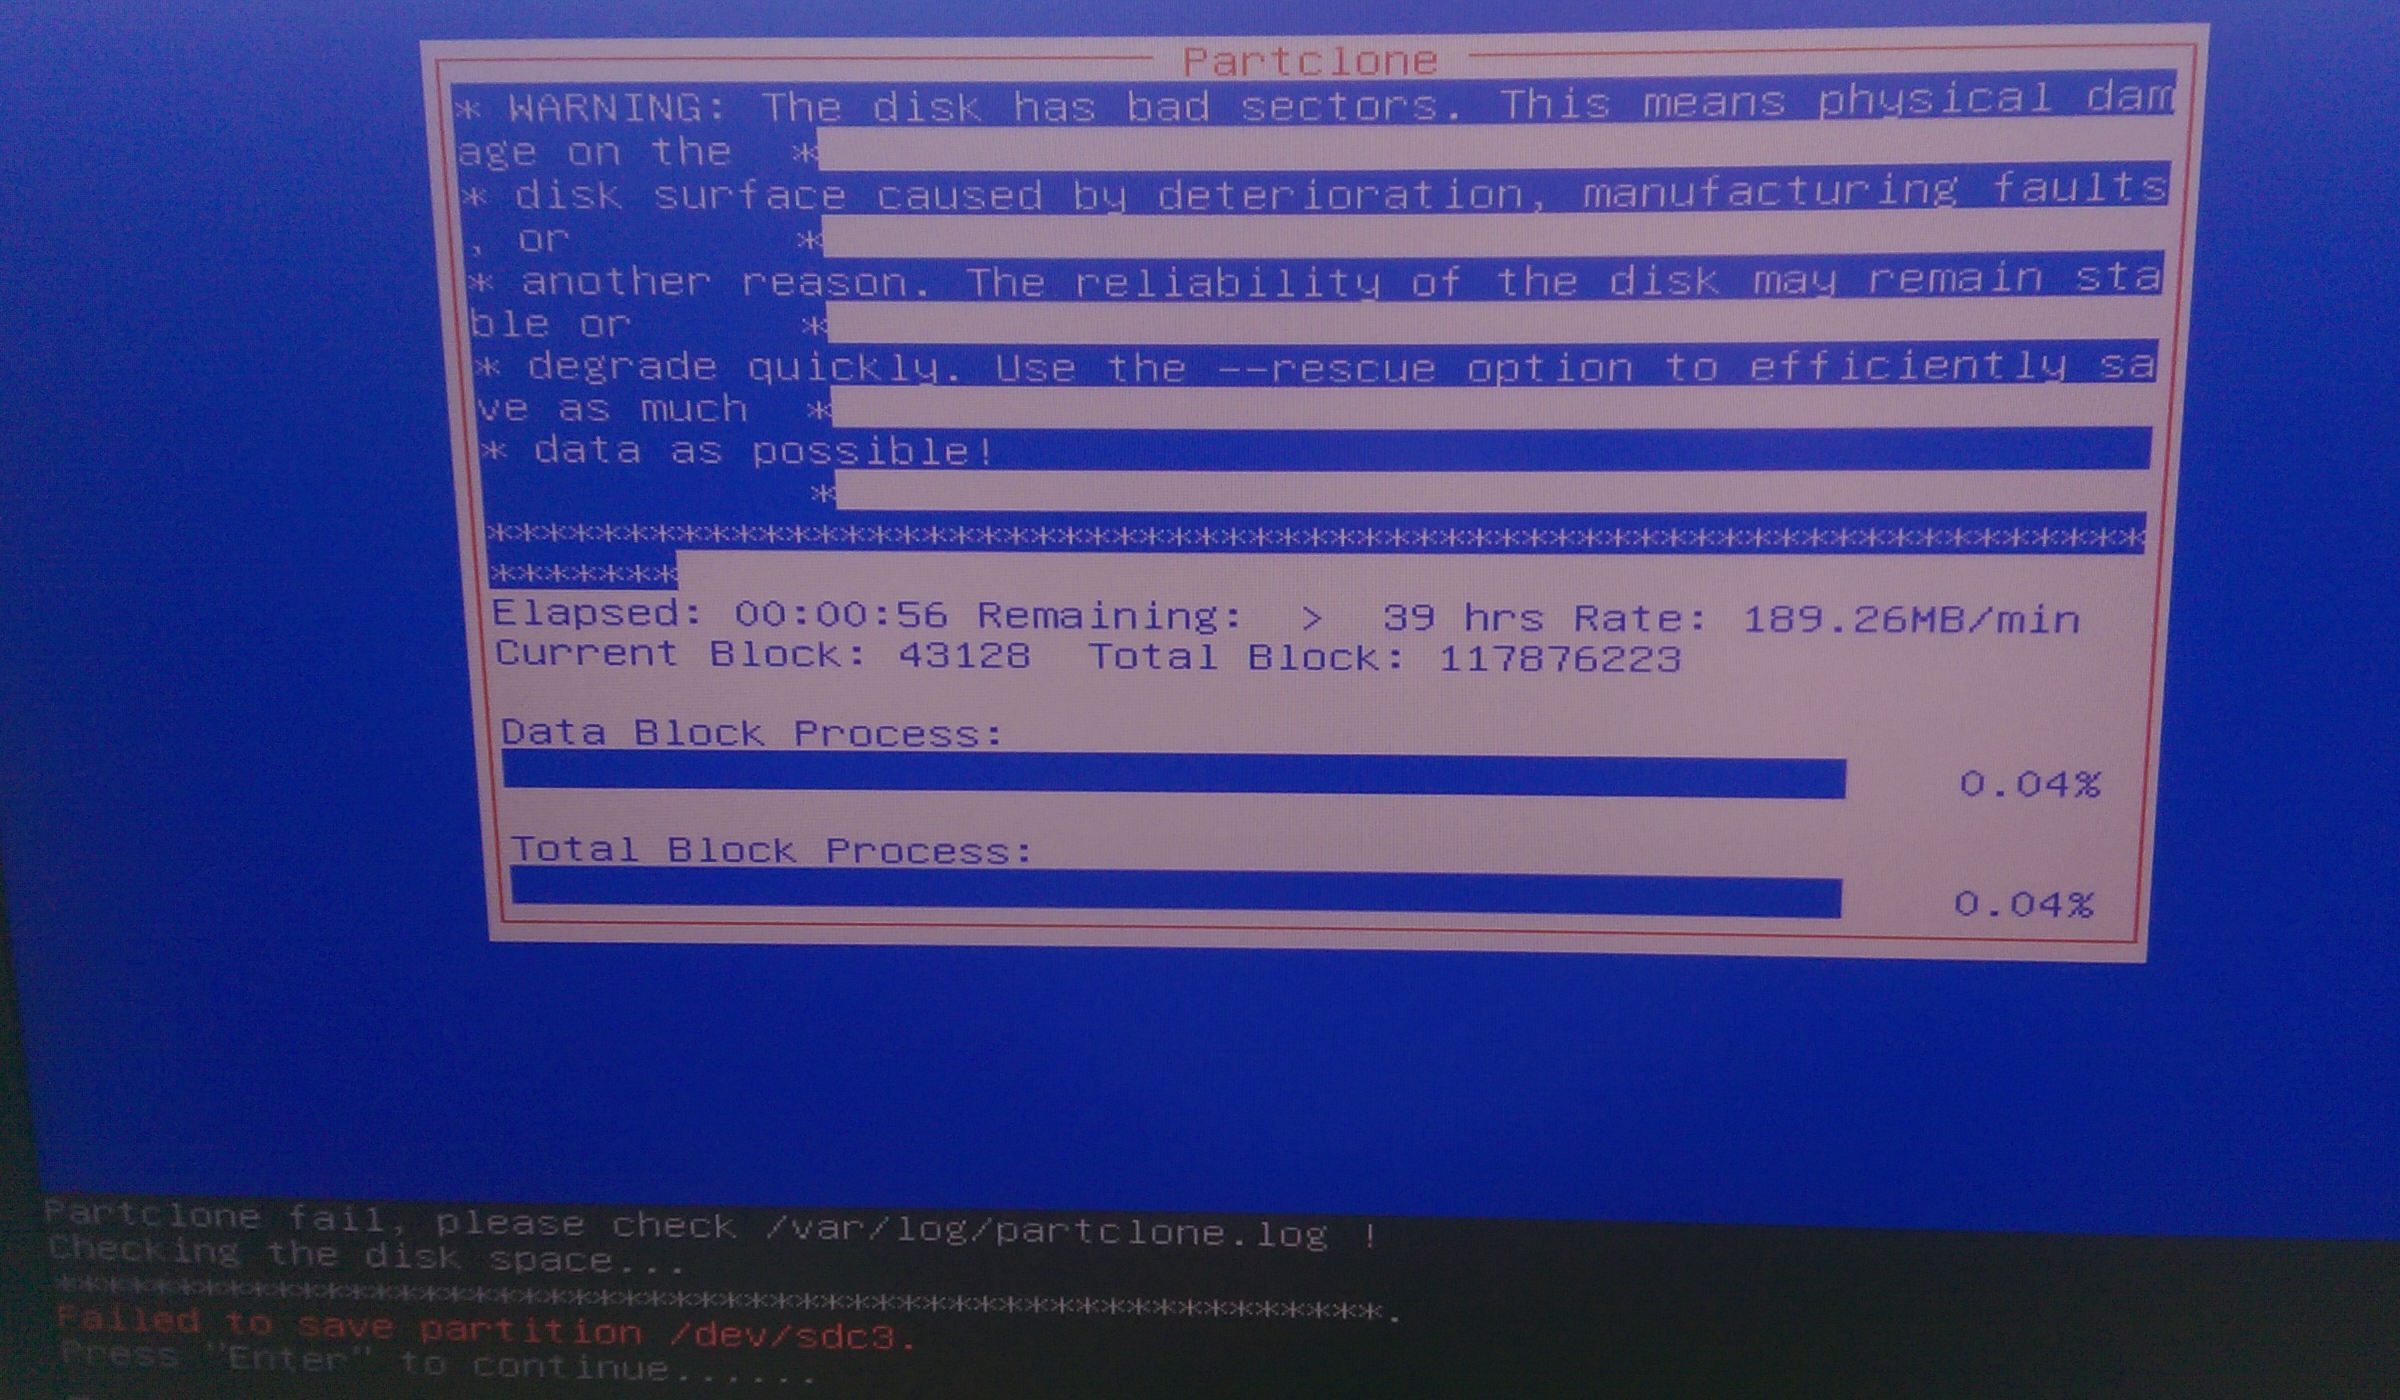
After enabling "Expert options" and enabling ––rescue flag, it started to do something. However, estimated completion time of 40+ hours wasn't exactly exciting. Apparently, Clonezilla/partclone is slow! I'd love to have a solution that actually works, preferrably today.
Ddrescue and open-source stupidities
Few more Google searches later I learned about ddrescue. It's yet-another-Linux-software that can do almost anything - iff you can master its arcane command-line arguments. As their "manual" tells it succinctly:
This tutorial is for those already able to use the dd command. If you don't know what dd is, better search the net for some introductory material about dd and GNU ddrescue first.
Dude, I AM reading the ddrescue manual. What other introductory material about ddrescue should I search for? 🙁
Since ddrescue is included in clonezilla USB image, I launched bash and tried the simplest possible version:
user@debian:$ ddrescue /dev/sdc3 /home/partimag/hdimage.img /home/partimag/rescue.log
It failed with error "Can't open input file: Permission denied". Apparently, you need to use sudo. My next attempt was actually successful!
user@debian:$ sudo ddrescue /dev/sdc3 /home/partimag/hdimage.img /home/partimag/rescue.log
So, here we are, after 5 hours of running.. Estimated remaining run time is 25 minutes and it has recovered everything but 100MB of data from the HDD... Fingers crossed!

18 hours later my fingers were still crossed.. WTF?

Well... Hidden in the ddrescue manual is this great note:
The 'remaining time' is calculated using the average rate of the last 30 seconds and does not take into account ... Therefore it may be very imprecise, may vary widely during the rescue, and may show a non-zero value at the end of the rescue. In particular it may go down to a few seconds at the end of the first pass, just to grow to hours or days in the following passes.
Holy fuck, why on earth would you show "remaining time" if you very well know that it's "very imprecise"? Does it make your program go any faster? No. Does it help your user in any way? No. It just pisses everyone off.
All in all, ddrescue ran for around 48 hours - recovering 99.98% of data. There were still 45MB of non-scraped data left but I decided that it's not worth to wait 40-50 more hours to rescue mere 20-30 megabytes.
Lesson learned - reading data from unreadable sectors is really slow. Prepare to wait for days!
Analyze the rescued image
Recovering data is great. But what to do with the 0.02% of data that were unreadable? ddrescue log can tell you that sector 0x12345000 was unreadable - but you will have no idea which file occupied that sector. Since I'm a Windows guy, I decided to modify ddrescue's suggested approach a bit and used Windows tools when possible.
First, run ddrescue with ––fill-mode argument:
printf "BABEC0DE" > tmpfile
ddrescue --fill-mode=l- tmpfile /home/partimag/hdimage.img /home/partimag/rescue.log
rm tmpfile
It will take the image file and mark all unreadable sectors with "BABEC0DE" and relevant sector/position information based on the log file. The affected part of file will look like this:
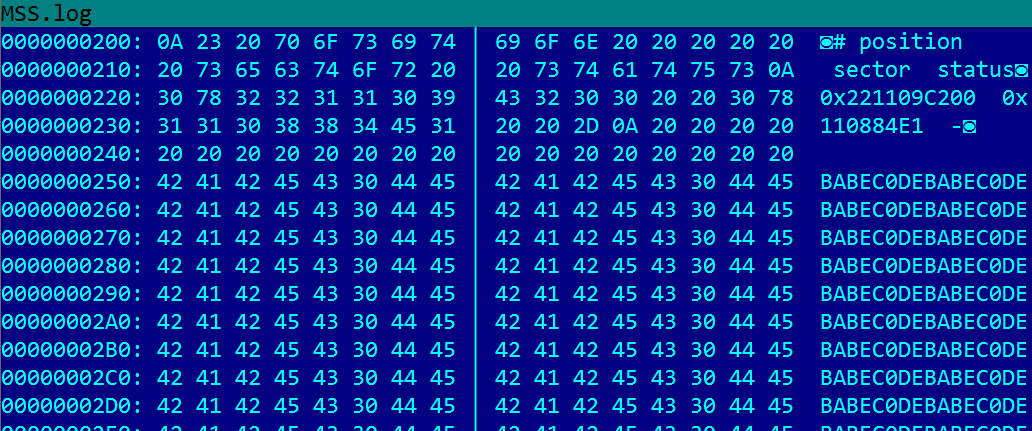
You can pick whatever text you want - I didn't want to use suggested "DEADBEEF" constant, as it is much more commonly used and might actually appear in some valid files.
Second, reboot into Windows and use OSFMount to mount the created hdimage.img:
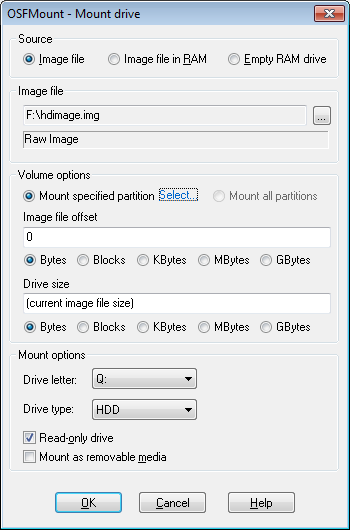
Finally you can see files and folders from the damaged disk. Now use whichever Windows tool you like to search for "BABEC0DE". In my case, there were 16 files affected - 12 videos and 4 log files. So, nothing of value was lost! 🙂
Write the rescued image to the new hard drive
If you have Acronis or other Windows cloning software, you could use that to write HDD image to new disk. Since I didn't have any, I use Clonezilla's bootable USB and Linux standard dd command:
sudo dd if=/home/partimag/hdimage.img of=/dev/sdb3 bs=1M status=progress
After an hour and a half all the data were transferred to the new disk. Now I just needed to put HDD back into the laptop, boot up the system and run chkdsk to make sure that everything is fixed.
After 3 evenings and plenty of swear words, it's a great success! 🙂
Final words
There are two kinds of people, those who back up their stuff and those who have never lost all their data. Be smart and make sure you have proper backups! Otherwise, be prepared to spend few evenings learning Linux disk management tools and cursing their command-lines.
Till next time!
Great post, I had once a failed hdd with a head crash and wasn't able to recover the data. You could hear the head scratching on the disk. Linux & Windows didn't even detect the hdd anymore. Luckily nothing important was lost. 🙂
Please share the unpacker method for enigma 4.0. We love you and we follow you. Lifeinhex <3
Great writeup about your journey! Thanks for sharing your experience.
Once, I had to recover a faulty notebook HDD as well ... and I ended up using testdisk and, for me, that I never left a machine turned-up alone for a whole day, leaving it powered on for more than 53 hours was a nightmare, especially because the progress percent was "blocked" at a fixed value for hours: very discouraging indeed!
Yeah, backups can save you from panic if the data is yours and you have something important to rescue!
Thanks and Best Regards,
Tony
good and entertaining, thnks!
Painful journey. I've been there too. After two days, it was easier to let go a couple of files than punch my monitor... Again
Depends on what files you're about to lose. The entire ransomware "industry" is based on the fact that people don't make backups but value their files a lot..
BTW, "email" field is not mandatory. You can leave it blank next time. 😉
So...I had a few lols while i read the article which was very very interesting ! (good article Kao)...i have 1 or 2 drives that are about to fail, backed up the important shit ...and wait for them to fail ! next , I'll pretend to be Thor and use Mjolnir 😀 😛 🙂
Good experience learned useful method
I just used your guide to recover a 3TB drive. It ends up with recovering 99,99%. I am really annoyed by not knowing which files are damaged, but I can't seem to find a program which let's me check inside files. Which did you use?
And, the part with --fill-mode=- how do you go to the next row? I can't seem to get that working either.
Answered in email