Solving 0x777h’s crackme
Ox777h's crackme was posted on Tuts4You forum in October 2022. Description said that it uses simple anti-debugging and code virtualization, so I decided to take a look.
In this post I'll describe how the protection works and steps I took to defeat it.
However, this is not a full and comprehensive analysis of the protector code or the code virtualization feature. When solving crackmes, I prefer to choose the simplest solution that gets the job done. This is also reason why I did not use ready-made tools like VMAttack, Detours, FRIDA and the like...
Quickly about code virtualization.
Code virtualizers are generally considered one of the hardest software protection methods to defeat. Why is that? Let's see what features a common code virtualization solution offers:
- Packer. Original program code is packed/encrypted and decoded on runtime.
- Anti-debug protection. Most protectors use some sort of anti-debugging protection in their code.
- Code obfuscation. Most protectors add junk code, some use control-flow flattening, constant obfuscation and other techniques.
- And finally, the actual virtual machine with custom instruction set.
If you have just a single feature, like junk code, it's actually quite easy to reverse. The difficulty comes from the combination of all protector features and also how well they are combined.
There are several ways to defeat code virtualization:
- completely devirtualize the code. This is the ultimate success, you have recovered the original x86/x64 code, or a close approximation of it;
- make a disassembler for the particular VM, disassemble PCode and understand how the algorithm works;
- trace the VM execution, and use trace data to understand how the algorithm works;
- patch VM handlers and/or PCode;
If you want to learn more about code virtualization in general, I can wholeheartedly recommend Tim Blazytko's blogpost, as well as his Software Deobfuscation training. They are awesome!
With that in mind, let's look at our crackme and see what protections it contains.
Crackme overview.
Encrypted code.
The crackme is an x64 binary that uses a custom protector. If you open crackme.exe in your favorite hex editor, you'll notice that .code section appears to be encrypted. OK, maybe you will not notice that. smile
Just check the entropy of each PE section with a tool like DiE:

So, our first step would be to unpack the file.
Anti-debug protection.
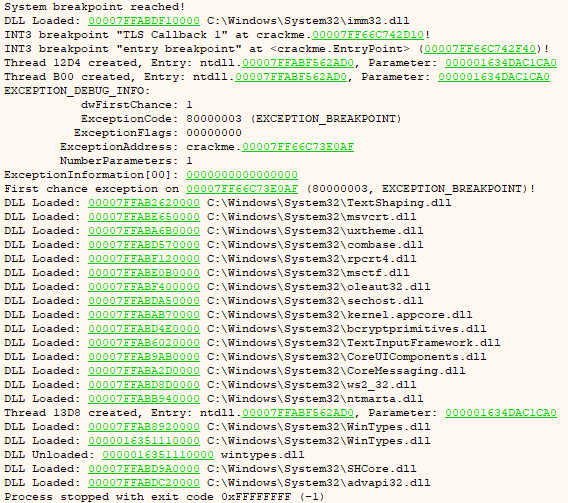
To unpack the crackme properly, we'd need to run it under debugger, find OEP and dump the process memory. However, when you try to run the crackme under x64dbg, you'll see that it throws breakpoint exception and terminates:

You also cannot attach to a running process, as it will terminate immediately.
I spent some time trying different ScyllaHide options but without any success. Debugging the startup code allowed me to note some of the features:
- It uses a lot of Nt* functions;
- It manually maps ntdll.dll in memory and (probably) extracts syscall ids;
- The rest of the protection uses syscalls directly;
- And the protection code is mostly virtualized!
At this point I decided to try something else. Let's run the crackme without the debugger, dump process memory and try to attack it using static analysis!
Note: if Scylla fails to dump the process, use Process Hacker -> Select crackme.exe process -> Properties -> Memory -> select crackme.exe sections -> Save... and then rebuild PE header.
Junk code.
Dumped file is surprisingly readable in IDA. We can soon find a suspicious part in .code section:

Following the jump, we see a combination of push constant+call followed by data which is very typical for a VM startup:

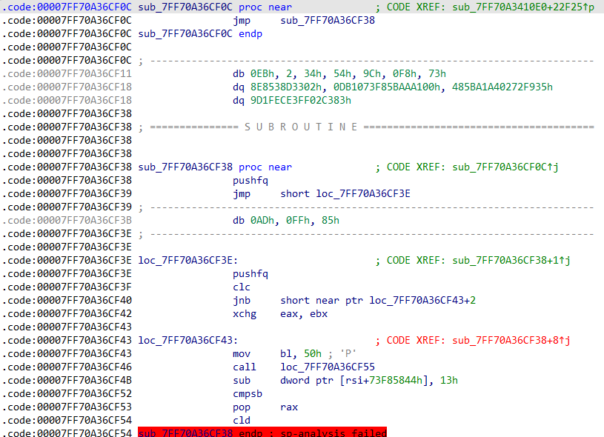
Following that, we see some code that looks like an obfuscated spaghetti code:

So, it looks like we have located our VM but the code is obfuscated. We'll need to take care of that first.
Deobfuscating junk code.
After spending some time cleaning the junk code, you'll notice it uses several specific patterns for obfuscation.
jmp+junk
![]()
The simplest of patterns - it's a short jump and few junk bytes. We can use hex editor and simple regex to replace this with 5 nops.
clc+jnb and stc+jb

First, a carry flag is set to a know value using clc or stc instruction. Then a conditional jump is used to confuse IDA's analysis. Jump distance is usually very short - 2,3 or 4 bytes. Just like before, we can use regex to replace replace clc+jump+junk code with nops.
Big obfuscated do-nothing
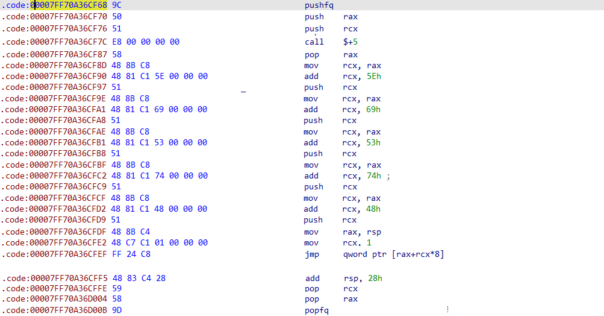
Once the simple jumps are replaced, you'll notice a much larger obfuscation pattern:

The pattern begins with pushfq, followed by call and 2 jumps and ends with the popfq. This example uses RAX, but it can be also RDX or some other register.
It's easy to find the end of the pattern just by looking for next popfq instruction.
Even larger do-nothing
And finally, there's a more complicated pattern. It's so large that I had to use graphic editor to stitch it all together for you. Notice that all nops, jumps and junk code are removed from the image!

As with the previous pattern, it's easy to find the end of it, just look for combination of pop rcx, pop eax and popfq.
And we're done with code obfuscation! smile We've identified obfuscation patterns and found a way to deal with them.
Analyzing VM dispatcher
Now we're able to see what is happening on VM startup. First flags and registers are saved:
|
1 2 3 4 5 6 |
.code:00007FF70A36CF38 pushfq .code:00007FF70A36CF66 push r15 .code:00007FF70A36D00C push r14 .code:00007FF70A36D0BD push r13 .code:00007FF70A36D15C push r12 ... more pushes ... |
Then the VM state is prepared and VM dispatcher is reached:
|
1 2 |
.code:00007FF70A36E6B0 xor rdx, rdx .code:00007FF70A36E6E0 mov dl, [rsi] ; fetch next opcode |
And finally next handler is executed:
|
1 2 3 4 5 6 7 |
.code:00007FF70A36E068 mov rax, rsp .code:00007FF70A36E11C add rax, 0F8h .code:00007FF70A36E13C mov rax, [rax] ; table of handler addresses .code:00007FF70A36E13F xor rbx, rbx ; .code:00007FF70A36E169 mov ebx, [rax+rdx*4] ; RDX contains the next opcode .code:00007FF70A36E199 sub rax, rbx .code:00007FF70A36E1C3 jmp rax ; ---> next handler is executed |
Writing VM tracer
For last few years I've written most of my tools in C#. Now I need to hook x64 code and C# is not really suitable for that. So, I dusted off my trusted old copy of Delphi XE2.
Also I needed some injector that would inject my DLL into running crackme.exe process. I randomly chose one the first results from Google search: https://github.com/danielkrupinski/Inflame
I chose to hook VM dispatcher between "add rax, 0F8h" and "mov eax,[eax]" instructions. Since I didn't have any decent x64 hooking library for Delphi XE2, I made my own "hooking" code. It's ugly and you definitely shouldn't do that in production code. But for the crackme it's fine!
|
1 2 3 4 5 6 7 8 9 10 11 |
hookAddress := imageBase + $2E123; returnAddress := imageBase + $2E13B; d := PDword(hookAddress)^; if (d = $000004E8) then begin // check whether the hooked address contains correct bytes Writeln(Format('Hooking address %x',[hookAddress])); VirtualProtect(pointer(hookAddress), $100, PAGE_EXECUTE_READWRITE, @oldProtection); PWord(hookAddress)^ := $BB48; // mov rbx, const PUInt64(hookAddress + 2)^ := UInt64(@MyHook); PWord(hookAddress + $A)^ := $E3FF; //jmp rbx VirtualProtect(pointer(hookAddress), $100, oldProtection, @oldProtection); end; |
And this is the code responsible for logging VM context. Nothing fancy, just get values from memory and log them to console.
|
1 2 3 4 5 6 7 8 9 10 11 12 13 14 15 16 17 18 19 20 |
opcode := (savedRDX and $FF); actualRSP := savedRAX - $F8; rax := PUInt64(actualRSP+$70)^; rbx := PUInt64(actualRSP+$78)^; rcx := PUInt64(actualRSP+$80)^; rdx := PUInt64(actualRSP+$88)^; rsi := PUInt64(actualRSP+$90)^; rdi := PUInt64(actualRSP+$98)^; rxx := PUInt64(actualRSP+$A0)^; ryy := PUInt64(actualRSP+$A8)^; r8 := PUInt64(actualRSP+$B0)^; r9 := PUInt64(actualRSP+$B8)^; r10 := PUInt64(actualRSP+$C0)^; r11 := PUInt64(actualRSP+$C8)^; r12 := PUInt64(actualRSP+$D0)^; r13 := PUInt64(actualRSP+$D8)^; r14 := PUInt64(actualRSP+$E0)^; r15 := PUInt64(actualRSP+$E8)^; eflags := PUInt64(actualRSP+$F0)^; Writeln(Format('PC=%.08x/%.08x opcode=%.02x RAX=%.08x RBX=%.08x RCX=%.08x RDX=%.08x RSI=%.08x RDI=%.08x RXX=%.08x RYY=%.08x R8=%.08x R9=%.08x R10=%.08x R11=%.08x R12=%.08x R13=%.08x R14=%.08x R15=%.08x EFL=%.02x',[savedRSI, savedRSI - UInt64(CrackmeImageBase), opcode, rax, rbx, rcx, rdx, rsi, rdi, rxx, ryy, r8,r9,r10,r11,r12,r13,r14,r15,eflags])); |
Analyzing tracer output
Now, let's run the crackme, inject tracing dll and enter some random serial. We'll get output similar to this:
|
1 2 3 4 5 6 7 8 9 |
PC=7FF66C736ECC/00046ECC opcode=0C RAX=59652FF960 RBX=20CE5537D10 RCX=FFFFFFFF RDX=7FF66C70F040 RSI=00000000 RDI=59652FF9C4 RXX=59652FF8E0 RYY=00000000 R8=7FF66C710520 R9=7FF66C6F0000 R10=00000050 R11=7FF66C710520 R12=00000000 R13=00000000 R14=00000000 R15=00000000 EFL=202 PC=7FF66C736ED0/00046ED0 opcode=0C RAX=59652FF960 RBX=20CE5537D10 RCX=FFFFFFFF RDX=7FF66C70F040 RSI=00000000 RDI=59652FF9C4 RXX=59652FF8E0 RYY=00000000 R8=7FF66C710520 R9=7FF66C6F0000 R10=00000050 R11=7FF66C710520 R12=00000000 R13=00000000 R14=00000000 R15=00000000 EFL=202 PC=7FF66C736EDB/00046EDB opcode=0A RAX=59652FF960 RBX=20CE5537D10 RCX=FFFFFFFF RDX=7FF66C70F040 RSI=00000000 RDI=59652FF9C4 RXX=59652FF8E0 RYY=00000000 R8=7FF66C710520 R9=7FF66C6F0000 R10=00000050 R11=7FF66C710520 R12=00000000 R13=00000000 R14=00000000 R15=00000000 EFL=202 PC=7FF66C736EDF/00046EDF opcode=0C RAX=59652FF960 RBX=20CE5537D10 RCX=FFFFFFFF RDX=7FF66C70F040 RSI=00000000 RDI=59652FF9C4 RXX=59652FF8E0 RYY=00000000 R8=7FF66C710520 R9=7FF66C6F0000 R10=00000050 R11=7FF66C710520 R12=00000000 R13=00000000 R14=00000000 R15=00000000 EFL=206 .... PC=7FF66C736F9C/00046F9C opcode=0C RAX=59652FF960 RBX=20CE5537D10 RCX=00000000 RDX=7FF66C70F040 RSI=00000000 RDI=59652FF9C4 RXX=59652FF8E0 RYY=00000000 R8=7FF66C710520 R9=7FF66C6F0000 R10=00000050 R11=7FF66C710520 R12=00000000 R13=00000000 R14=00000000 R15=00000000 EFL=202 PC=7FF66C736FA0/00046FA0 opcode=13 RAX=59652FF960 RBX=20CE5537D10 RCX=00000000 RDX=7FF66C70F040 RSI=00000000 RDI=59652FF9C4 RXX=59652FF8E0 RYY=00000000 R8=7FF66C710520 R9=7FF66C6F0000 R10=00000050 R11=7FF66C710520 R12=00000000 R13=00000000 R14=00000000 R15=00000000 EFL=202 PC=7FF66C736F20/00046F20 opcode=0C RAX=59652FF960 RBX=20CE5537D10 RCX=00000000 RDX=7FF66C70F040 RSI=00000000 RDI=59652FF9C4 RXX=59652FF8E0 RYY=00000000 R8=7FF66C710520 R9=7FF66C6F0000 R10=00000050 R11=7FF66C710520 R12=00000000 R13=00000000 R14=00000000 R15=00000000 EFL=202 PC=7FF66C736F2B/00046F2B opcode=08 RAX=59652FF960 RBX=20CE5537D10 RCX=00000000 RDX=7FF66C70F040 RSI=00000000 RDI=59652FF9C4 RXX=59652FF8E0 RYY=00000000 R8=7FF66C710520 R9=7FF66C6F0000 R10=00000050 R11=7FF66C710520 R12=00000000 R13=00000000 R14=00000000 R15=00000000 EFL=202 |
So far it doesn't look like much, does it? But by examining the instruction pointer PC values, we can see that opcode 0x13 can change PC significantly. So opcode 0x13 is probably a (conditional) jump instruction.
Let's modify our code and log only jumps. Log file is much shorter, and the final few lines are the most interesting.
|
1 2 3 4 |
PC=7FF66C737713/00047713 opcode=13 RAX=00000000 RBX=2AEC5977B90 RCX=00000008 RDX=7FF66C70F040 RSI=00000000 RDI=BB03B3F734 RXX=BB03B3F650 RYY=00000000 R8=7FF66C710520 R9=7FF66C6F0000 R10=00000054 R11=7FF66C710520 R12=00000000 R13=00000000 R14=00000000 R15=00000000 EFL=283 PC=7FF66C7377E4/000477E4 opcode=13 RAX=00000031 RBX=2AEC5977B90 RCX=00000043 RDX=000000F0 RSI=00000000 RDI=BB03B3F734 RXX=BB03B3F650 RYY=00000000 R8=7FF66C710520 R9=7FF66C6F0000 R10=00000054 R11=7FF66C710520 R12=00000000 R13=00000000 R14=00000000 R15=00000000 EFL=297 PC=7FF66C7377F2/000477F2 opcode=13 RAX=00000031 RBX=2AEC5977B90 RCX=00000043 RDX=000000F0 RSI=00000000 RDI=BB03B3F734 RXX=BB03B3F650 RYY=00000000 R8=7FF66C710520 R9=7FF66C6F0000 R10=00000054 R11=7FF66C710520 R12=00000000 R13=00000000 R14=00000000 R15=00000000 EFL=297 PC=7FF66C737844/00047844 opcode=13 RAX=00000000 RBX=2AEC5977B90 RCX=00000043 RDX=000000F0 RSI=00000000 RDI=BB03B3F734 RXX=BB03B3F650 RYY=00000000 R8=7FF66C710520 R9=7FF66C6F0000 R10=00000054 R11=7FF66C710520 R12=00000000 R13=00000000 R14=00000000 R15=00000000 EFL=283 |
Specifically, on 2nd line we can see RAX=31. That's ASCII code of "1", the first character of fake serial that I entered. In RCX we see value 0x43. Could it be the correct first character of serial and this is "goodboy/badboy" jump?
Patching VM context and obtaining the correct serial
Let's modify our logger one more time - on our suspected goodboy jump it will set VM flags to a default value, so that the jump is always taken.
|
1 2 3 |
if savedRSI - UInt64(CrackmeImageBase) = $477E4 then begin PUInt64(actualRSP+$F0)^ := $246; end; |
We run crackme again, enter a fake serial, and get a good boy message!
|
1 2 3 4 5 6 7 8 9 10 11 12 13 14 15 16 17 18 19 20 21 22 23 24 25 26 27 28 29 30 31 32 |
PC=7FF66C7377E4/000477E4 opcode=13 RAX=00000031 RBX=20BB70A78C0 RCX=00000043 PC=7FF66C7377E4/000477E4 opcode=13 RAX=00000032 RBX=20BB70A78C0 RCX=00000038 PC=7FF66C7377E4/000477E4 opcode=13 RAX=00000033 RBX=20BB70A78C0 RCX=00000036 PC=7FF66C7377E4/000477E4 opcode=13 RAX=00000034 RBX=20BB70A78C0 RCX=00000043 PC=7FF66C7377E4/000477E4 opcode=13 RAX=00000035 RBX=20BB70A78C0 RCX=00000030 PC=7FF66C7377E4/000477E4 opcode=13 RAX=00000036 RBX=20BB70A78C0 RCX=00000030 PC=7FF66C7377E4/000477E4 opcode=13 RAX=00000037 RBX=20BB70A78C0 RCX=00000043 PC=7FF66C7377E4/000477E4 opcode=13 RAX=00000038 RBX=20BB70A78C0 RCX=00000032 PC=7FF66C7377E4/000477E4 opcode=13 RAX=00000000 RBX=20BB70A78C0 RCX=00000031 PC=7FF66C7377E4/000477E4 opcode=13 RAX=00000000 RBX=20BB70A78C0 RCX=00000036 PC=7FF66C7377E4/000477E4 opcode=13 RAX=00000000 RBX=20BB70A78C0 RCX=00000031 PC=7FF66C7377E4/000477E4 opcode=13 RAX=00000000 RBX=20BB70A78C0 RCX=00000038 PC=7FF66C7377E4/000477E4 opcode=13 RAX=00000000 RBX=20BB70A78C0 RCX=00000034 PC=7FF66C7377E4/000477E4 opcode=13 RAX=00000000 RBX=20BB70A78C0 RCX=00000037 PC=7FF66C7377E4/000477E4 opcode=13 RAX=00000000 RBX=20BB70A78C0 RCX=00000030 PC=7FF66C7377E4/000477E4 opcode=13 RAX=00000000 RBX=20BB70A78C0 RCX=00000042 PC=7FF66C7377E4/000477E4 opcode=13 RAX=00000000 RBX=20BB70A78C0 RCX=00000039 PC=7FF66C7377E4/000477E4 opcode=13 RAX=00000000 RBX=20BB70A78C0 RCX=00000043 PC=7FF66C7377E4/000477E4 opcode=13 RAX=00000000 RBX=20BB70A78C0 RCX=00000036 PC=7FF66C7377E4/000477E4 opcode=13 RAX=00000000 RBX=20BB70A78C0 RCX=00000045 PC=7FF66C7377E4/000477E4 opcode=13 RAX=00000000 RBX=20BB70A78C0 RCX=00000042 PC=7FF66C7377E4/000477E4 opcode=13 RAX=00000000 RBX=20BB70A78C0 RCX=00000035 PC=7FF66C7377E4/000477E4 opcode=13 RAX=00000000 RBX=20BB70A78C0 RCX=00000045 PC=7FF66C7377E4/000477E4 opcode=13 RAX=00000000 RBX=20BB70A78C0 RCX=00000033 PC=7FF66C7377E4/000477E4 opcode=13 RAX=00000000 RBX=20BB70A78C0 RCX=00000043 PC=7FF66C7377E4/000477E4 opcode=13 RAX=00000000 RBX=20BB70A78C0 RCX=00000041 PC=7FF66C7377E4/000477E4 opcode=13 RAX=00000000 RBX=20BB70A78C0 RCX=00000032 PC=7FF66C7377E4/000477E4 opcode=13 RAX=00000000 RBX=20BB70A78C0 RCX=00000041 PC=7FF66C7377E4/000477E4 opcode=13 RAX=00000000 RBX=20BB70A78C0 RCX=00000036 PC=7FF66C7377E4/000477E4 opcode=13 RAX=00000000 RBX=20BB70A78C0 RCX=00000044 PC=7FF66C7377E4/000477E4 opcode=13 RAX=00000000 RBX=20BB70A78C0 RCX=00000035 PC=7FF66C7377E4/000477E4 opcode=13 RAX=00000000 RBX=20BB70A78C0 RCX=00000031 |
Now we can take all logged values from RCX and obtain a correct serial:
|
1 |
C86C00C21618470B9C6EB5E3CA2A6D51 |
TL;DR version
This is how the crackme was defeated:
- Dumped process memory and used it for static analysis in IDA;
- Avoids all anti-debug tricks;
- Used simple regex replaces to defeat junk code;
- We'll probably break some things but it doesn't matter, as we won't run the broken code;
- Analyzed VM startup and VM dispatcher;
- Used DLL injection to get my code running in the crackme process;
- My code hooks VM dispatcher and dumps VM state before each instruction;
- Analysis of executed operations allowed me to locate goodboy/badboy jump;
- My hook code patched flags to always take goodboy jump;
- We can see correct password in VM registers;
Conclusion
This was a really nice virtual machine, combined with an original anti debugging protection. It's not as difficult as VMProtect or Themida but it was fun to reverse nevertheless.
Hello kao , do you have update for molebox virtualization ?
No.
Thanks for the great writeup! Great work as always!